Saturday, October 21, 2017
21 October 2017 - Driver side in-dash clicking
Its been almost two months since I replaced the faulty actuators. The A/C system is working very well!
21 October 2017 - Reimbursement from Fiat Chrysler
Well I really didnt expect to get a "refund" from Chrysler but it happened.
The alternator failed May 2017 and I replaced it in May. August of 2017 a recall notice in regards to the alternator failure was issued. So on 6 September, I went to the Dodge website and submitted all the required paperwork for a refund. On 20 October 2017 I received a full refund for the alternator!!!
I am very impressed and happy about that!
Wednesday, September 6, 2017
6 Sept 2017 - Recall Notices
Recalls so far...
| Recall Number | Date Issued | Date Completed | Description |
| S43 | 7/1/2016 | 6/1/2017 | PASSENGER AIRBAG INFLATOR |
| T36 | 8/24/2017 | -NA- | LD/LX/LC, WD-WK 160/180 AMP ALTERNATORS |
| P01 | 2/12/2014 | 6/1/2017 | ENGINE TIMING CHAIN AND CHAIN GUIDE |
6 Sept 2017 - Recall Notice
5 Sept 2017 I received a recall notice regarding issues with the alternator.
I had a problem with the alternator in may of 2017 so I replaced it.
The recall paperwork(TSB) indicates that I might be able to get a reimbursement for the replacment I installed. I have now filed the required paperwork and its a matter of wait and see.
The reimbursement process takes about 60 days or so.
The TSB also indicates that even though I replaced the alternator that, Dodge must replace the unit to comply with the TSB.
Saturday, September 2, 2017
2 Sept 2017 - Driver side in-dash clicking
Today I was able to replace the faulty actuator. It was either an Air blend door actuator or heat/air blend actuator or those are one and the same.
Last week I ordered a replacement part but didn't have the opportunity to work on the RT.
The replacement is a bit of a pain, but with patience(about 3 hours or so) it can be done.
I positioned the driver seat as far back and low as it would go(it is the electric model).
Disconnect the battery. Since work is being done in the dash area and thats where the air bags reside, accidental deployment would be bad.
I decided to remove the lower dash piece. That required removing the door threshhold cover and the front piece of the door frame plastic. You will see what I mean as you remove the lower dash pieces/parts.
Once all of the screws are out, the lower dash piece can be popped out. There are two electric connectors to be wary of, left side of panel has the trunk release switch, right side has the sensor for the A/C.
After the plastic lower dash piece is out of the way, the metal plate needs to be removed.
Now it is ALOT easier to see the actuators and work on them.
The actuator that was faulty was the top most unit.
The tools I used to remove the unit;
To remove that top actuator, remove the screws holding the actuator to the housing. After the actuator is unfastened and removed from its mounting point, the electrical connector is all that is holding it up there in the dash. Pop the red piece holding the connector to the actuator and press and hold the connector to push it up and out of actuator.
Do a reverse of these steps to re-install. Patience, patience, patience is all I can say....


Last week I ordered a replacement part but didn't have the opportunity to work on the RT.
The replacement is a bit of a pain, but with patience(about 3 hours or so) it can be done.
I positioned the driver seat as far back and low as it would go(it is the electric model).
Disconnect the battery. Since work is being done in the dash area and thats where the air bags reside, accidental deployment would be bad.
I decided to remove the lower dash piece. That required removing the door threshhold cover and the front piece of the door frame plastic. You will see what I mean as you remove the lower dash pieces/parts.
Once all of the screws are out, the lower dash piece can be popped out. There are two electric connectors to be wary of, left side of panel has the trunk release switch, right side has the sensor for the A/C.
After the plastic lower dash piece is out of the way, the metal plate needs to be removed.
Now it is ALOT easier to see the actuators and work on them.
The actuator that was faulty was the top most unit.
The tools I used to remove the unit;
- T20 torx bit
- ratcheting wrench designed for screwdriver bits
- long standard screwdriver
- phillips screw driver
- variety of flashlights(handheld, magnetic handheld and headband style)
- 10 mm wrench for battery connector
- 10 mm socket for lower dash metal plate
To remove that top actuator, remove the screws holding the actuator to the housing. After the actuator is unfastened and removed from its mounting point, the electrical connector is all that is holding it up there in the dash. Pop the red piece holding the connector to the actuator and press and hold the connector to push it up and out of actuator.
Do a reverse of these steps to re-install. Patience, patience, patience is all I can say....


 |
The circle indicates the failure. The two missing teeth were the cause of the clicking sound. Now, the reason the teeth are missing, dunno, but that took ALOT of torque to destroy two teeth. |

Tuesday, August 29, 2017
29 August 2017 - Dash environmental system - actuator clicking
The under/in dash noise of a clicking sound is coming from a faulty actuator. The part number stamped on the item is 8679001. When that number is used in the local auto parts stores websites, two types of actuators are indicated. I couldn't get a very detailed look at the actuator in the dash that is faulty so I went ahead and ordered the part number of 8679001. Well the actuator I received does not look like the faulty one, but its does look like one of the other types used in my car. So I will buy the other part and then begin the replacement process.
Below are pictures of the part I ordered but not what is installed and faulty...have to re-order the correct part.


Below are pictures of the part I ordered but not what is installed and faulty...have to re-order the correct part.


Monday, August 28, 2017
28 August 2017 - A/C - Heate/blend air actuator
From this part number off of the faulty actuator, M8679001, I was able to buy the part from a local auto store.
I will continue to look into the best/easiest way to replace the actuator. I have all the tools needed, the correct parts(as far as I know).
I will continue to look into the best/easiest way to replace the actuator. I have all the tools needed, the correct parts(as far as I know).
28 August 2017 - Service / Repair Manuals
http://servicerepairmanuals.com/store/product_info.php?products_id=1057
$84 CD
http://repair.chiltondiy.com
$30 for a year
$84 CD
http://repair.chiltondiy.com
$30 for a year
Sunday, August 27, 2017
27 August 2017 - Driver side dash clicking noise
So I removed the driver side dash lower insulation/cover(just above the pedals). That allows pretty good access to the upper areas. I was able to determine which actuator was clicking. While trying to determine which one was faulty I found that a cam was disconnected from an arm that connects to the mechanism that has the faulty actuator. When I went to touch the cam, it literally fell out of the hole it was resting in, but fell behind the tunnel insulation. So I had to spend a bit of time to extract that part.
The actuator that is faulty is also used in a lower area of the dash on this same side of the drivers side area.
I am in the process of tracking parts down to then purchase and install.
The actuator that is faulty is also used in a lower area of the dash on this same side of the drivers side area.
I am in the process of tracking parts down to then purchase and install.
 |
| The circle is where the cam is supposed to go, the arrow points to the arm/pivot that the cam connects to |
 |
| This is the actuator that is making the clicking sound |
 |
| This is the cam that fell out of the hole marked in red in the above pic |
 |
| This is the cam that fell out of the hole marked in red in the above pic |
 |
| This is the size of the torx bit needed to remove/install the actuator |
 |
| This is a shot from below...the circle is where the cam is located and connects to that arm, the larger upper arrow is pointing to the clicking actuator |
Saturday, August 26, 2017
26 August 2017 - interior actuator clicking noise
So after reviewing what is on youtube...it looks like I might be able to fix the clicking noise in the dash. I need to make sure where the noise is coming from then I think I will take a shot at repairing the problem.
The local auto parts stores carry the parts!
The local auto parts stores carry the parts!
Saturday, June 17, 2017
17 June 2017 - Front bumper splash shield / under car splash shield
Installed the front bumper splash shield and under car splash shield.
That does not really require jacking the car up, but it would have been a little easier.
So now the OEM pieces/parts are now back in place.
That does not really require jacking the car up, but it would have been a little easier.
So now the OEM pieces/parts are now back in place.
Friday, June 16, 2017
16 June 2017 - Hood Scoops
Well it turns out the R/T Classic already had functional hood scoops! So now on to other possible, simple?!? mods.
Wednesday, June 14, 2017
14 June 2017 - Hood Scoops
The hood scoops can be replaced with functional pieces...
Here are the part number for the parts;
PN# 55399338AB
PN# 55399339AB
Here are the part number for the parts;
PN# 55399338AB
PN# 55399339AB

Tuesday, June 13, 2017
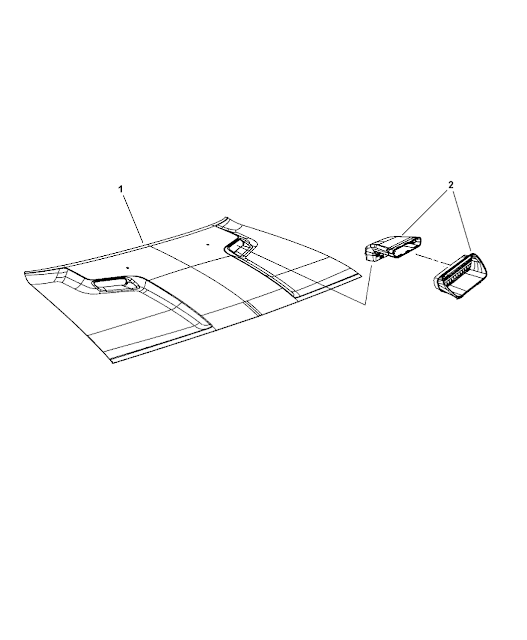
13 June 2017 - Under Car Splash Shield
I picked up the under car splash shield today from a local auto parts vendor.
It has been raining the past two days making it difficult to install the splash shields. If the weather is better I will install the hardware.
It has been raining the past two days making it difficult to install the splash shields. If the weather is better I will install the hardware.
 |
| This splash shield attaches underneath the front air dam/spoiler |
 |
| This splash shield attaches underneath the engine to the cross member |
Monday, June 12, 2017
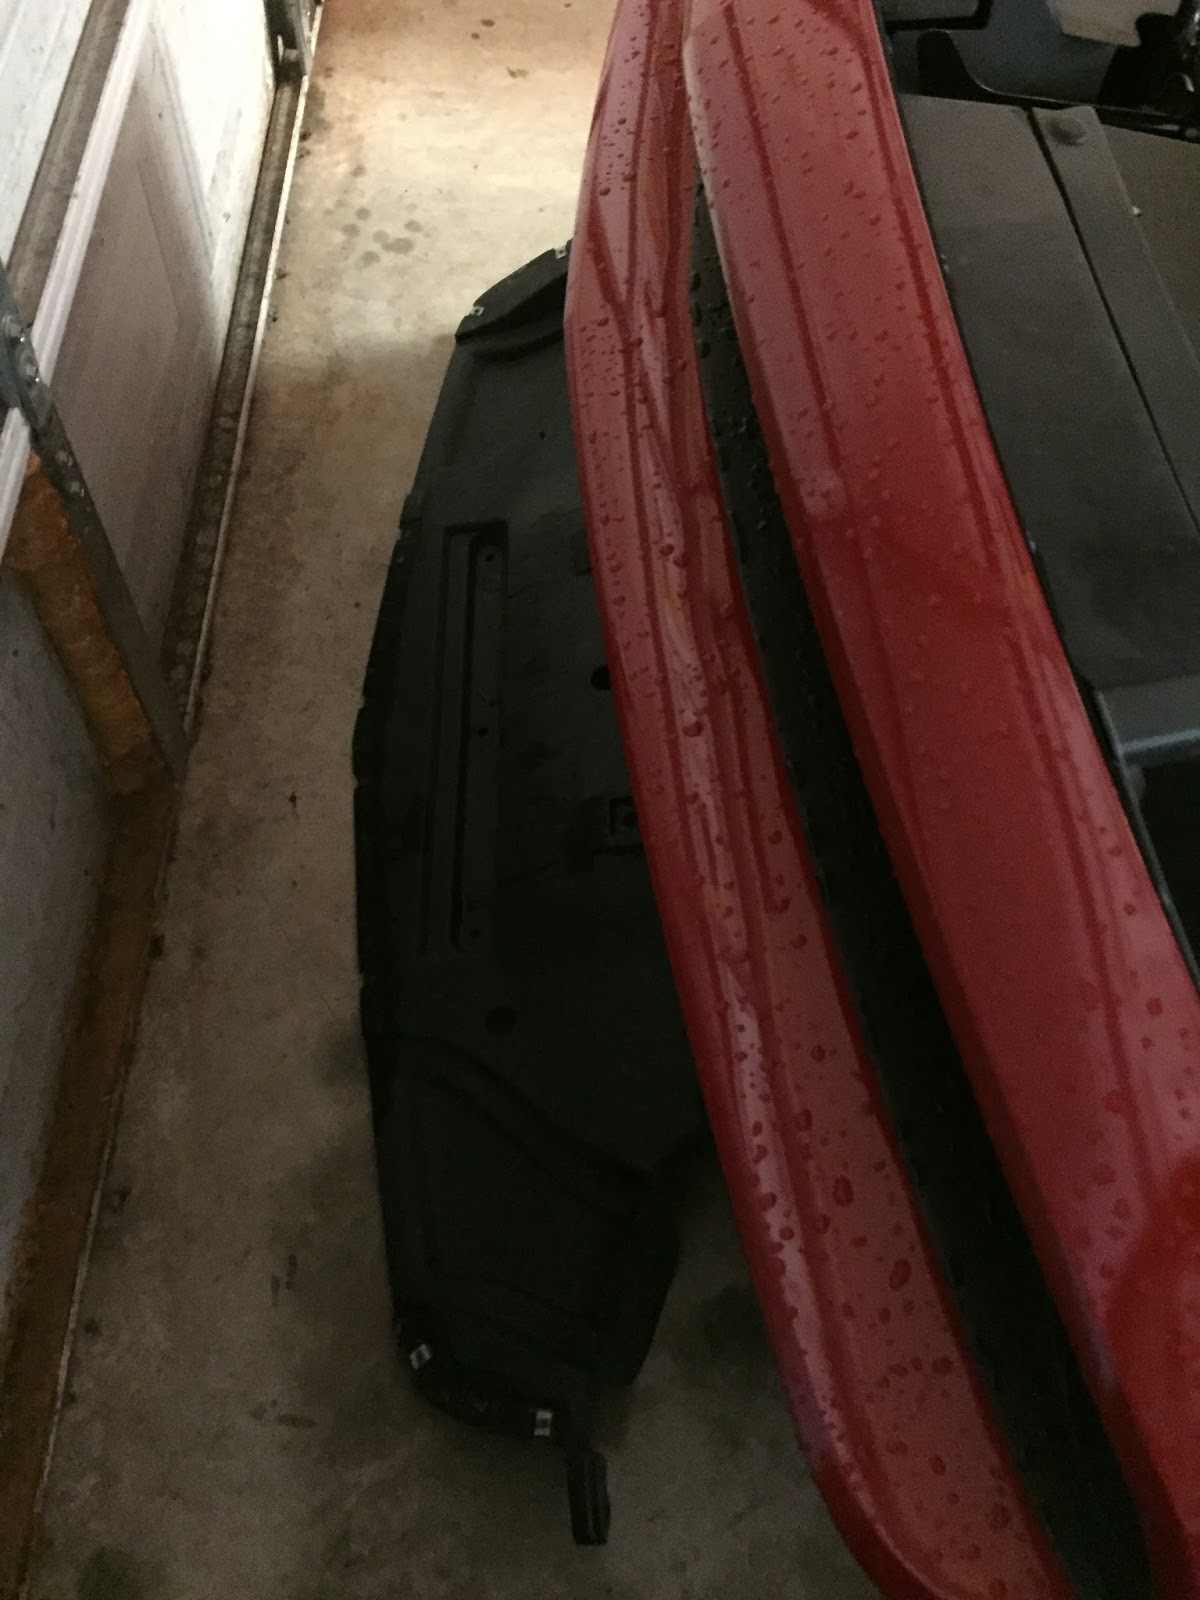
12 June 2017 - Engine Belly Pan / Under car splash shield
Apparently the splash shield under the engine has been removed at some time and never re-installed...
So I need to order a replacement unit...
04806074AH is the part number for the pan, also need the 4 screws to mount the panel...
The Dorman part number is 922-255. It is a kit that has the splash shield and the 4 fasteners
So I need to order a replacement unit...
04806074AH is the part number for the pan, also need the 4 screws to mount the panel...
The Dorman part number is 922-255. It is a kit that has the splash shield and the 4 fasteners
 |
| Item 3 is the under car splash shield part number 04806074AH, Dorman part number is 922-255 |
Sunday, June 11, 2017
11 June 2017 - Weekend MNX
This weekend...
Saturday - replaced the spark plugs 55,200 miles
Sunday - replaced the air filter 55,200 miles
Saturday - replaced the spark plugs 55,200 miles
Sunday - replaced the air filter 55,200 miles
Saturday, June 10, 2017
10 June 2017 - Spark plug change-out
Replaced all of the plugs today. I marked each of the plugs being removed to know which cylinder they were removed from...
Pieces/Parts required for this job
The die-electric grease is for the plug boots.
The torque for the plugs is on each box of the spark plug
First off, disconnect batter ground...
I usually wait about 30 minutes after disconneting power(its just what I do when working on industrial electronics).
If you know the hemi 5.7 firing order then you can keep up with what pieces/parts you are removing...
Heres an image of the firing order

It doesn't matter which side of the engine you start....
Each side is easily accessible...
The driver side cylinder one coil pack is somewhat of a pain...what I did to get to the fasterners; I unbolted the air box(there is only one fastener holding that in place), disconnect the airbox to manifold hose and remove the air box assembly. BTW there is a small hose that connects from the air box to the intake manifold, I disconnected mine at the airbox.
So basically, just disconnect the coil pack electrical connector, press down on the coil pack while loosening/removing the fasterners, carefully pull on the coil pack and out it comes.
I did this for each cylinder and marked each coil pack so I knew where it was installed...
...During the plug change...
I discovered that three cylinders have one of the two plugs with fouled threads. I will contact the dealership and see what they can do...
Pieces/Parts required for this job
- magnetic swivel spark plug socket(Gear Wrench 80546)
- 16 spark plugs - part number LZFR5C-11
- die-electric grease
- spark plug gap gauge
- torque wrench
The die-electric grease is for the plug boots.
The torque for the plugs is on each box of the spark plug
First off, disconnect batter ground...
I usually wait about 30 minutes after disconneting power(its just what I do when working on industrial electronics).
If you know the hemi 5.7 firing order then you can keep up with what pieces/parts you are removing...
Heres an image of the firing order
It doesn't matter which side of the engine you start....
Each side is easily accessible...
The driver side cylinder one coil pack is somewhat of a pain...what I did to get to the fasterners; I unbolted the air box(there is only one fastener holding that in place), disconnect the airbox to manifold hose and remove the air box assembly. BTW there is a small hose that connects from the air box to the intake manifold, I disconnected mine at the airbox.
So basically, just disconnect the coil pack electrical connector, press down on the coil pack while loosening/removing the fasterners, carefully pull on the coil pack and out it comes.
I did this for each cylinder and marked each coil pack so I knew where it was installed...
...During the plug change...
I discovered that three cylinders have one of the two plugs with fouled threads. I will contact the dealership and see what they can do...
 |
| Replacement plug picked up from local Auto store... |
 |
| Original plug removed to show part number |
Wednesday, June 7, 2017
6 June 2017 - Back from the shop
Picked up the challenger today, service dept. assured me that the problems have been resolved.
The p0016 and p000b error codes were caused by a variable valve timing solenoid. The check engine light would almost immediately light up when the sport mode button was selected.
So, now it seems the car is running as it should. Hopefully there will not be any more problems with this car in the near future.
ToDo:
- replace serpentine belt
- replace spark plugs
- replace air filter
Tuesday, June 6, 2017
6 June 2017 - Back from the shop
Picked up the challenger today, service dept. assured me that the problems have been resolved.
The p0016 and p000b error codes were caused by a variable valve timing solenoid. The check engine light would almost immediately light up when the sport mode button was selected.
The p0016 and p000b error codes were caused by a variable valve timing solenoid. The check engine light would almost immediately light up when the sport mode button was selected.
Friday, June 2, 2017
2 June 2017 - Back to the shop
I stopped by the service dept of the dealership today. A tech read codes from the car and verified the p0016 and p000B codes. He said that he cleared the codes started and ran the car and the p0016 code did not show.
I told the tech and the service manager that the codes happened right after pressing the "sport mode" button. So after a few minutes of discussion another tech walked over and mentioned that a bulletin about the variable valve timing solenoid was out. And that if the p0016 and p000B codes were happening simultaneously that the solenoid was the issue. But the tech that worked on the car was very concerned that the p0016 could still be due to the recall work dealing with the timing chain and tensioner.
So Monday the car will go back in the shop, the tech will make sure the hardware he installed is good and then he will work on the p000B error.
I am glad they are on the ball and getting this car fixed, I look forward to driving it again.
Thursday, June 1, 2017
1 June 2017 - Back from the dealership - warranty work
Picked up the challenger today. The recall call issues were dealt with and so I thought the car was fine.
So While driving the car today, the check engine light comes on and the error code is p0016 and now there is a p000b code. I immediately called the service dept of the dealership to let them know they did not resolve/address the p0016 problem. The person on the phone kept telling me that the p0016 code was caused by the wrong oil viscocity and that they changed the oil and filter and that fixed the problem. And of course it didn't.
So after talking with the service manager, he could only recommend bringing the car in to see what is going on.
Hopefully the service dept can properly resolve the issues.
Wednesday, May 31, 2017
31 May 2017 - TSB - Recalls
Dropped off the car at the dealership so that two TSB/Recalls could be resolved.
First one is the air bags. The parts are on hand now and can be installed.
The second one is the timing belt and belt tensioner. Parts are available and can be installed.
Service department told me it would take a day and a half just for the timing belt issue. And maybe a half a day for the air bags. So its looking like two days in the shop for the challenger.
Since its in the shop I asked them to take a look at the Check engine light - error code p0016.
31 May 2017 - Alternator installation check
Fired up the challenger today to make sure the alternator installation was good and it worked as it should. The battery icon went out and stayed out.
Monday, May 15, 2017
15 May 017 - spark plug change out
Going to be doing a spark plug change-out. The car still has the factory plugs! But it has been running just fine.
Spark plugs - LZFR5C-11 - NGK - F1000424136NGK - plug gap 0.043"
spark plug tool - Gear Wrench 5/8" x 6" Magnetic Swivel Spark Plug Socket Part No. 80546
Spark plugs - LZFR5C-11 - NGK - F1000424136NGK - plug gap 0.043"
spark plug tool - Gear Wrench 5/8" x 6" Magnetic Swivel Spark Plug Socket Part No. 80546
Sunday, May 14, 2017
14 May 2017 - Alternator repairs/replacement
Today I finished installing the alternator. It did not go in as seen on the YouTube videos. So I had to improvise the re-installation process. I ended up having to drain the coolant system and remove the upper radiator hose to install the alternator. I should have just removed that hose for the whole process.
By removing the upper hose, it was waaaaaay easier to put in the alternator, install the cabling and mount it to the engine. Because the alternator is located in that lower front passenger side its some kinda hard to get wrenches/tools to remove/install pieces parts.
Now with a bit of planning it can be done, just take it easy and watch out for the brake lines that are in that area.
I needed 13mm and 16mm ratcheting wrenches to remove/install the mounting bolts of the alternator and the support rod to the motor mount. I needed a 12" flat bladed screw driver.
There is an assembly that connects the air box to the intake manifold. That assembly needs to be removed. Use the screw driver to loosen the two clamps then remove the assembly. There is also a mounting bracket that the assembly mounts to, that needs to be removed(16mm fitting).
The three 16mm bolts that hold the alternator to the engine are fairly easier to get to and loosen. The top of the alternator has one 16mm bolt that fastens it to the engine. The bottom of the alternator has two 16mm bolts next to each other that mount to the lower part of the engine. The lower back of one of the 16mm bolts has a support rod that connects to the motor mount with a 13mm nut.
To remove/install the 13mm nut for that support rod, I ended up using a 13mm ratcheting wrench and a rectangular neodymium magnet. I put the magnet towards the open end of the wrench then used a long flat bladed screw driver with the tip on the magnet so that I could position the closed end ratchet on the 13mm nut from above. Once it was on(believe me that was very easy to place, seeing is believing) it was just a matter of getting on the ground and reach up and twist the wrench to remove/install the nut.
The three 16mm can then be loosened. Because of the location of the alternator the two lower bolts cannot be loosened and removed, so you have to loosen those bolts as much as you can and still get your tool out of the way. The bolts, once loosened can be hand loosened until completely out of the threaded mounting holes. It takes some patience to get those bolts out. Then loosen and remove the upper mounting bolt and hold the alternator while doing that to unload it to make removal easy. Once that top bolt is out the alternator can then be positioned pulley down so that back connections can be removed. I used a piece of card board and tucked it down below the alternator so I had something to rest it on instead of the hoses/electrical wires. One connector is a plug in connector the other is a bolt on, using a 13mm nut. Move the cabling that connected to the alternator out of the way. Now position the alternator and remove each bolt. Keep in mind the bolt that has the support rod has to go back in the same location/position. I just left the support rod on the bolt and removed that as an assembly. During all of this movement of the alternator, be very carefull to not damage the brake lines and hoses. Once all the bolts are out, the alternator can be lifted out passed the upper radiator hose that was disconnected and drained earlier.
Installation is pretty much the reverse, just be super careful of the hoses/lines.
Saturday, May 13, 2017
13 May 2017 - Battery icon Dash Display
Yesterday the battery icon lit up while driving the car. I have seen this error in this way on many vehicles. The error indicates a fault with the charging system. This error is typically caused by a faulty alternator. So I removed the alternator from the car and had a local Auto parts store check the alternator. And as expected the alternator failed the tests. Now I need to install the replacement and run test the installation to make sure everything is working. Its late in the day now so I will do that tomorrow.
Friday, May 12, 2017
12 May 2017 - Warranty...Warranty...Warranty...
Well, the car has about 7000 miles left of the warranty. And today two problems happened. First one is a check engine light with a code P0016 – Crankshaft position/camshaft position, bank 1 sensor A -correlation. That is what the code reader tool kicked out. From the reading I have done about that error this is not a whole lot that I can do to resolve that, but I am still looking into it.
The second error is the battery icon lights up randomly while the engine is running. From what I have read so far about that error and the way its happening it appears to be the alternator.
So I will be busy troubleshooting these issues this weekend.
The second error is the battery icon lights up randomly while the engine is running. From what I have read so far about that error and the way its happening it appears to be the alternator.
So I will be busy troubleshooting these issues this weekend.
12 May 2017
This blog will be about the maintenance/upgrades of the 2012 Dodge R/T Classic.

 |
| Disconnected the battery ground since I will be working on the alternator |

 |
| That is the engine bay panel |
 |
| Top view of the alternator, now its easier to see since the lower engine bay panel is removed |
 |
| another shot of the alternator from the top |
Subscribe to:
Comments (Atom)
-
Yesterday, after the car was delivered from the dodge service dept., a clicking noise started coming from the dash after opening the door. ...
-
Yesterday the battery icon lit up while driving the car. I have seen this error in this way on many vehicles. The error indicates a fault ...
-
 Apparently the splash shield under the engine has been removed at some time and never re-installed... So I need to order a replacement uni...